
How to Stop Losing Ableton Projects: Folder Setup, Backups & Sample Management

How to Organise, Back Up, and Bulletproof Your Ableton Work
If you’ve ever opened an Ableton project and been greeted by “Media Files Missing” — or worse, lost entire sessions to a failed hard drive — you know how painful it can be. The good news? It’s completely avoidable.
This guide walks you through a bulletproof system to organise your files, safeguard your work, and future-proof your music production setup.
I personally have had some complete nightmares when it comes to losing Ableton projects, and until it happens to you (unless it already has) then you can not fathom the absolute pain knowing your work is lost forever. One time I had a harddrive failure and I lost 2 EPs that were ready for a label along with a remix. No joke, I couldn’t face opening Ableton for MONTHS after this - I was devastated.
I have also witnessed, and regularly have to fix many students filing systems in order to prevent such a headache happening to them. As we should all know by now with technology, if it can go wrong eventually it will go wrong.
So today I present a fool proof way to sort your stuff out and never lose a project, sample or preset again.
Step 1: Use a Dedicated Hard Drive for Music Production
Let’s start with the foundation. If you’re producing regularly — especially with sample packs — your internal hard drive will fill up fast. That’s where a dedicated external hard drive becomes a game-changer.
Everything Ableton-related lives here:
Projects
Samples
Presets
User Library
This keeps your system clean, makes backups easier, and lets you take your entire setup anywhere. I recommend an SSD especially if you are going to be taking the harddrive with you and moving it around. (The story above of mine was due to the mechanical failure of a disk hard drive.
Recommendation - Samsung T7, SanDisk Extreme.
Step 2: Locate and Move Your Ableton User Library
Ableton creates the User Library automatically when you install the software and this is where it stores your custom presets, samples, effect racks, and more.
To move it to your external drive:
In Ableton’s left sidebar, locate the User Library under “Places”
Right-click it and select “Show in Finder” (Mac) or “Show in Explorer” (Windows)
Drag the entire User Library folder into your newly created
/Ableton Masterfolder on your external hard driveNow go to Ableton > Preferences > Library
Under Location, click “Change” and point it to the new User Library location on your external drive
This keeps your custom content in one place and prevents Ableton from creating duplicates across your system.
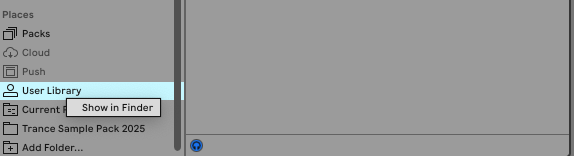
1&2: Locate your User Library

3. Drag the User Library to your Master Folder.

4 & 5: Point Ableton to the correct User Library.
Step 3: Create a Folder for All Your Projects
Still inside your /Ableton Master folder, create a new folder called /Projects.
From now on, every .als file you create should live here.
This keeps your Project Files for every project you start. If you have projects randomly located around your computer then find them and drag them into this.
Bonus Advice - Organise your Projects by year, and genre. So have a folder inside your Projects folder called “2025”. This will allow you to go back and find projects down the line with ease as trust me, you will have a lot of projects after a year or two using Ableton.

My own filing system for my Live Projects - each year also has sub-folders of each genre as I make and teach many different styles
Step 4: Keep All Samples Inside the User Library
Dragging in samples from random folders? That’s a recipe for disaster.
Instead:
Manually place new samples into
/User Library/Samples/ImportedOr, drag them into that folder from within Ableton’s Browser
This ensures:
Everything you use stays within your Master Folder
No broken sample paths
Clean project loading, every time

This is the User Library Sample folder inside of Ableton - this will have all your samples so you can drag them into your project.

In order to add samples to the folder - add them by dropping them directly into the folder on your hard drive. They will then show inside of the Ableton Sample folder.
Step 5: Use “Collect All and Save” (At Key Points)
Even with a tidy setup, samples from outside folders can sneak into your projects.
Use File > Collect All and Save when:
You’re finishing a track
You’re about to collaborate or send the file
You’re archiving or backing it up
This pulls all external samples into the project folder — fully self-contained and portable.

Step 6: Back It All Up to the Cloud
Even external drives can fail. The final line of defence is a real-time cloud backup.
I use and highly recommend Dropbox due to the ability to back up multiple devices in real-time.
Sync your entire /Ableton Master folder, so:
Every project and sample is backed up continuously
You get version history (rollback if needed)
You can work across machines with zero friction
If the worst case happens and you do lose your hard drive then all you need to do is download your backed up Master Folder and put it on your new hard drive.
Summary: Your Bulletproof Ableton File System
Use a dedicated external hard drive
Move your User Library into a central Master Folder
Save all projects into a
/ProjectsfolderStore all samples in the User Library
Use Collect All and Save at milestones
Set up cloud sync for real-time, off-site backup
Ready to Take Your Music Further?
You’ve just sorted your folders — now let’s sort your sound.
At Decloak Music, we offer one-to-one online lessons in:
Ableton Live – From absolute beginner to advanced production
Synthesis & Sound Design – Create your own signature sounds
Workflow & Creative Coaching – Get unstuck and finish more music
All tailored to your genre, your goals, and your schedule.
👉 Book your free 30-minute intro session and start making real progress with your music today.